
Assemble Your Own Square Barrel Sauna with Firewood Heater: A Quick Step-by-Step Guide
Sauna Specifications
- 2.4 m length square sauna
- 3 wood cradles for sauna stability
- 8-10 person capacity
- Overall Dimensions: 240 cm L x 210 cm W x 210 cm height
- Approximate Weight: 450-510 kg
- High-Grade Cedar
- Wood Thickness: Approximately 3.85 centimeters
- 5/16 (0.8 cm) inch full glass door
- High-grade 304# stainless steel bands, hinges, fasteners, hardware, and accents
Wood Fired Heater Specifications
- Heater Body Dimension: L × W × H = 630 mm × 360 mm × 540 mm
- Material of Heater and Flue : 304 Stainless Steel
- Heater Body Dimension: L × W × H = 630 mm × 360 mm × 540 mm
- Circulates water using thermosiphon principle
- Eliminates the need for a circulating pump and electricity
- Maximises efficiency and utilizes an optimal heat exchange design
- Double wall water jacket surrounding firebox acts as heat transferring surface.
- Designed specifically for hot tubs and saunas
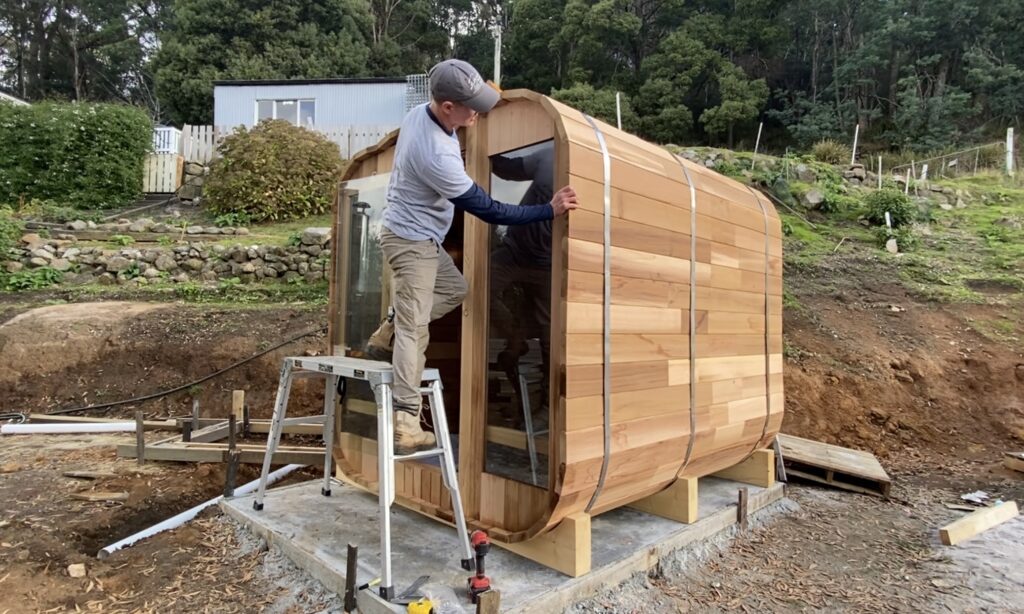
How to Install a Square Barrel Sauna
Learn how to assemble your own 2.4 m square cedar barrel sauna with firewood heater as we showcase one of our installation projects!
We recently completed an installation of 2.4m cedar barrel sauna in Derby, TAS and we are here to share our experience with you so that you too can enjoy the blissful benefits of having your own outdoor oasis!
Our square barrel sauna showcases a complete set of large glass panels to take in the surrounding scenery, and installed with a firewood heater as heat source.
- Lay out the three base cradles on a flat surface, and make them equidistant and parallel to each other.
- Lay down center stave at the cradle’s center, and make sure the stave hangs out the cradle by 100 millimeters.
- Square the cradles by measuring the diagonals of the cradles. This will ensure that the sauna will be built square and straight
- Lay down the staves for each side and temporarily fasten them with screws. Complete the bottom (floor) part of the sauna.
- Assemble the front and back wall panel by fastening the parts with the provided planks. Take note of the pre-drilled holes for easy installation and proper alignment.
- Install the front and back panels into the slots of the staves, and temporarily secure them. Have someone hold the walls as you place at least two staves on top to keep them secure.
- Install the staves around the sauna. Make sure you tap each stave with a rubber mallet when installing to minimize clearances between them.
- As you install the topmost staves, make sure to install the staves with the firewood heater opening. When you install this piece, make sure it is aligned to the heater placement. You can make sure the heater placement is centered by looking at the heater outlet hole of the back wall.
- Do not force to complete the staves at topmost part of the sauna, you will need at least one more stave. Leave it as is for now.
- Install the three stainless steel strap around the sauna equidistant from each other. It is best that the tightening rods are aligned with each other. Slowly tighten them but not completely.
- Before finally tightening the straps, completely cover the sauna with the last stave. You may need to cut to adjust the width the stave to be able for it to fit.
- Install the benches inside the sauna. You can see the pre-installed planks on the wall where you can fasten the benches on.
- Install the metal plates provided in the outlet hole of the sauna. This will protect the wood near the heater against the heat from the wood fired heater.
- Install the wood fired heater and flue, as well as the gasket for the flue.
- If you have bitumen shingles included, you can then install the shingles on the sauna exterior.
- Derby, TAS